Connector
Connector is a PC based utility that facilitates and automates the transfer of files (uploading and downloading) between a connected PC and the Preceda environment. All transfers can be run manually by the user or they can be scheduled via Windows Scheduled Tasks or Web services, to run at regular intervals automatically.
The following types of file transfer windows are available:
- Mapper Import - Provides import capabilities to pass eternal .csv files from a client PC/Server to the Preceda database including Time Entry file PAY34T.
- Download - Provides the ability to download files from the IFS to a PC/Server on the clients network.
- PTCM - Preceda Time Collection Manager (PTCM) coordinates the various processes associated with sending Preceda Time data from Time Clocks or externally formatted .csv files to the Preceda People database.
PTCM Capabiities Include:
- Communication with Proxy Servers
- Usage of HTTPS Security if required
- Ability to not be affected in cases of network communication failures
- Recognition of DB unavailability
- Additional user enrollment validation in the database to run uploads
SAP - Provides the ability transfer data from a client's SAP HR Information System to the hosted Preceda Payroll environments. The client will be responsible for any maintenance and editing of data prior to the transfer to the Preceda System. Any errors detected by the import process will be reported and the maintenance and correction of the data in error will be performed by the clients on their own machine, and the data re-transmitted.
Directory Upload/Download - The Directory Upload/Download allows for applications outside of Preceda the ability to use Preceda Connector in uploading and downloading files based on file types.
PC/Server Environment requirements for Preceda Connector
- The PC must have Microsoft Windows 2000 or Windows XP installed.
- The PC must have a static IP address assigned if using PTCM to communicate Clocks and ClockComms software to capture time clock data.
- The PC must have TCP/IP access to the server containing the Preceda People database.
- The device must have an existing Preceda People database at Release 10.8 or greater.
- Preceda Time Management must be activated if using PTCM.
Rules and Guidelines
As with any application that moves data between environments, its use comes with some rules.
- In general, the use of this tool will initially be part of a Professional Services engagement to provide configuration and training.
- It should be noted that an experienced IT person would have little trouble configuring this tool based on the guidance and the help text. The likely guidance required would be the details of the system path name.
- It is important to remember that Preceda Connector does not take into account any Payrun Environment, Security Profile, or Access Profile to which the user may be attached. All data is transferred.
- Clients will need to manage who has access to this new functionality to minimize the risk that inappropriate data is obtained or loaded.
- The PC/Server that Preceda Connector is installed on will retain the encrypted user ID and password that is used to access the data. The application should be secured on the PC/Server to ensure only valid users can execute the application.
- Download the Connector software into the PC/Server to be used as described in the Prerequisites.
- Double click on the Preceda Connector.zip file.
- Extract all files to a folder on the PC.
- Install the software by double clicking on the setup.exe file.
- Follow the prompts to install the software.
The first screen confirms that InstallShield will run the installation.
Click Next to continue.
Preceda Connector Setup
The first window confirms that InstallShield will run the installation.
>> Click Next to continue.
License Agreement
The next window displays the terms and conditions of the License Agreement.
>> Select Yes to continue.
Choose Destination Location
This window Identifies where you want the software installed.
>> Select Next to continue.
Select Program Folder
Select the Program Folder where the Preceda Connector icons will be listed.
>> Select Next to continue.
InstallShield Wizard Complete
>> Select Finish to complete the installation.
When Preceda Connector has been successfully installed, you must initiate the Preceda Connector process to first establish the server to which you are connecting.
- From Windows, select Start | Programs | Preceda Connector.
- From the Preceda Connector toolbar select Tools | Server information.
Host Name Enter the host name of the server you are connecting to, e.g. usually www.preceda.com.au. Port This pertains to the port number to be used. This can be left blank if the standard ports are being used.
Use SSL Check the box if the connection to be run is using SSL Security Socket Layer. User Name This pertains to the server user name of the person making the connection. Password This pertains to the server user password of the username. Database This pertains to the name of the database you are connected to:
- If using a proxy server for PTCM, enter the user name and password for the proxy server.
- If you are using Preceda Mapper, the following is required: A license key which is updated by the Hosted Administrator and requires an entry in the PPF27 file of:
- User Profile/ID
- The service name of Mapper and is access required for the above user profile/ID.
- If you are using Preceda Time Collection Manager (PTCM), the following is required: The Hosted Administrator must update the following in the PPF27 file:
- User Profile/ID
- The service name, which will be PTCM and is access required for the above User Profile/ID.
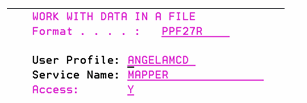
| User Profile | This pertains to the user name of the person you are giving access to. |
| Service Name | This pertains to the name of the service the user is accessing (i.e. MAPPER). |
| Access | Set this filed to Y to allow access. |
*Contact your Account Manager for more information about subscribing to Connector, and downloading the required tools